A laptop that moves between home, an office, and a lab often needs a different IP address, subnet mask, default gateway, and DNS server. Windows can obtain an address automatically, but a fixed address still has to be typed into the adapter each time you change networks. Typing it in the wrong place, or forgetting the last working set, is how a PC loses its connection.
IP Switcher in Windows Manager stores those IPv4 settings as named profiles and applies one to the current network adapter. You can keep a home profile and an office profile, then switch between them without opening the adapter properties again. This guide covers Windows 10 and Windows 11.
The sections below follow the window: how to create a profile, what Save and Apply each do, how to read the live adapter, and what to check before you change the address.
1. What can IP Switcher do?
The banner on the window says: Quickly switch between different network configurations. In practice that means:
- Save more than one network profile. Give each place a name, such as home or office, and keep its IP address, subnet mask, gateway, and DNS servers.
- Use a static address or DHCP. Leave Obtain an IP address automatically cleared for a fixed address, or select it when the router should assign the address.
- Copy the address the adapter is using now. Import Current IP fills the profile boxes from the live IPv4 settings.
- Apply a saved profile to the adapter. Apply writes that profile to the selected network adapter. Save only stores it.
- See what the adapter is using. Current Network Status shows the live IP address, mask, gateway, DHCP state, DNS, and connection status.
- Start with Windows and stay in the tray. Options can launch IP Switcher at sign-in and hide the window when you minimize it.
IP Switcher changes IPv4 settings on a network adapter. It does not join a Wi-Fi network or store a wireless password. For saved wireless profiles, use Wi-Fi Manager. To watch received and sent speed after you switch, use Network Monitor.
2. How do I open IP Switcher?
Open IP Switcher from the network tools in Windows Manager. The profile list and the buttons sit at the top. The address boxes are in the middle. Current Network Status is at the bottom and is read from the adapter. It is not an editor.
The buttons are:
- New: Create a profile and type a name for it.
- Save: Store the boxes into the selected profile. The adapter does not change.
- Delete: Remove the selected profile after you confirm.
- Apply: Write the selected profile to the current network adapter after you confirm.
- Options: Start with Windows, and minimize to the notification area.
- Exit: Close the window. Profiles are saved when the window closes.
The question-mark icon at the upper right shows a short note: create a profile for each network, enter the IP settings and click Save, then click Apply to apply the selected profile to the current network adapter. Online Help under that note opens this page.
3. How do I create a network profile?
A profile is a named set of IPv4 settings. Create one before you try to switch. The first time you open IP Switcher, the list can be empty.
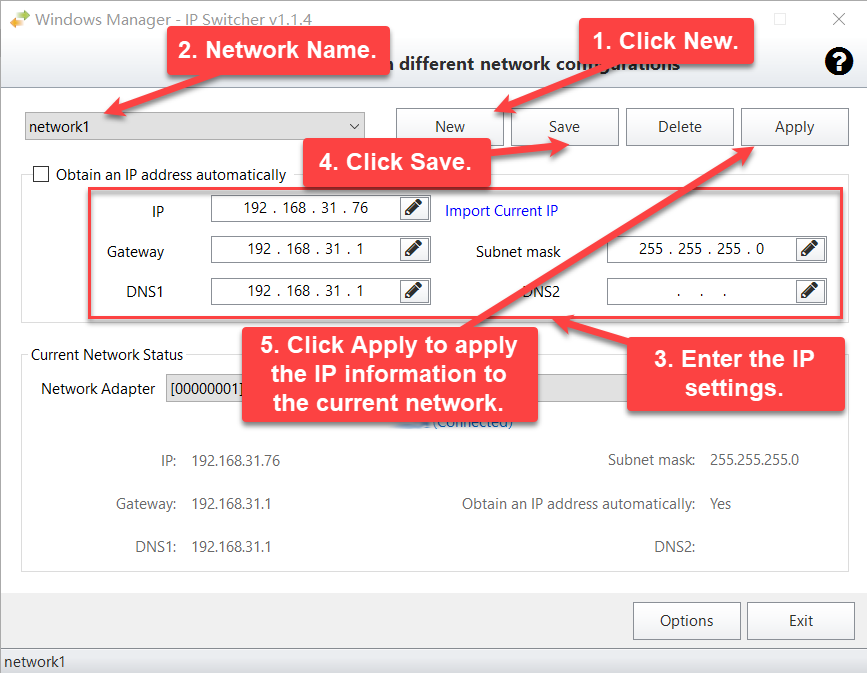
- Click New. IP Switcher asks you to type a name for the new profile. Use a name you will recognize later, such as Home or Office. Two profiles cannot share the same name. If the name already exists, you are told that the item with the same name already exists.
- Type a network name. The name appears in the list at the upper left and in the notification-area menu.
- Enter the IP settings. Fill in the IP address, subnet mask, gateway, and DNS servers, or select Obtain an IP address automatically.
- Click Save. The profile is stored. A message says that the current profile has been saved. The adapter is still using its previous address.
- Click Apply when you want those settings on the adapter. Apply asks you to confirm, then writes the profile to the current network.
Save and Apply are separate on purpose. You can prepare a second network while you are still online with the first one, and apply it only when you are ready to change.
4. What do the IP address, gateway, and DNS boxes mean?
These boxes belong to the selected profile. They are the settings you will save, not a live reading of the cable or Wi-Fi link.
- Obtain an IP address automatically: The profile uses DHCP. The IP address, subnet mask, gateway, and DNS boxes are cleared and cannot be edited. The router, or another DHCP server, assigns the address when you apply the profile.
- IP: The IPv4 address for this network, such as 192.168.1.10. A static profile needs this value. If it is empty, Apply tells you to fill in the IP address.
- Subnet mask: Usually 255.255.255.0 on a home or office LAN. A static profile needs this value too. If it is empty, Apply tells you to fill in the subnet mask.
- Gateway: The router address, such as 192.168.1.1. You can leave it empty when this adapter does not need a default route, but then this PC may not reach other networks.
- DNS1 and DNS2: The DNS servers. DNS2 can stay empty. If you put the same address in both boxes, Windows may keep only one, so the live status can show DNS2 blank after you apply.
- Import Current IP: Copies the adapter’s current IPv4 address, subnet mask, gateway, and DNS servers into the boxes. It does not apply anything, and it does not turn DHCP on or off. Click Save afterward if you want to keep what was imported.
Only IPv4 addresses are copied and applied. An IPv6 address on the adapter is left out of the profile.
5. What is the difference between Save and Apply?
Save writes the boxes into the selected profile. The network adapter keeps the address it already has. Current Network Status does not change just because you clicked Save.
Apply is the step that changes the PC. IP Switcher asks: Are you sure you want to apply the current profile configuration to the system? Choose No and the adapter is left as it is. Choose Yes and the profile is written to the adapter selected under Network Adapter.
- If Obtain an IP address automatically is selected, the adapter is set to DHCP and its DNS servers are cleared so they can be assigned automatically.
- If that box is cleared, the adapter receives the static IP address, subnet mask, gateway, and DNS servers from the profile.
The connection can drop for a moment while Windows applies the new address. When it finishes, Current Network Status should show the same IPv4 values as the profile. A message says that the current profile has been applied.
Apply uses the profile that is selected in the list, together with the adapter that is selected underneath. If the PC has more than one adapter, check the adapter name before you click Apply. A profile can store a different set of values for each adapter.
6. How do I switch to another network?
Keep one profile for each place. The upper boxes show the profile you have selected. The lower area shows the adapter you are on now. Those two can disagree until you apply.
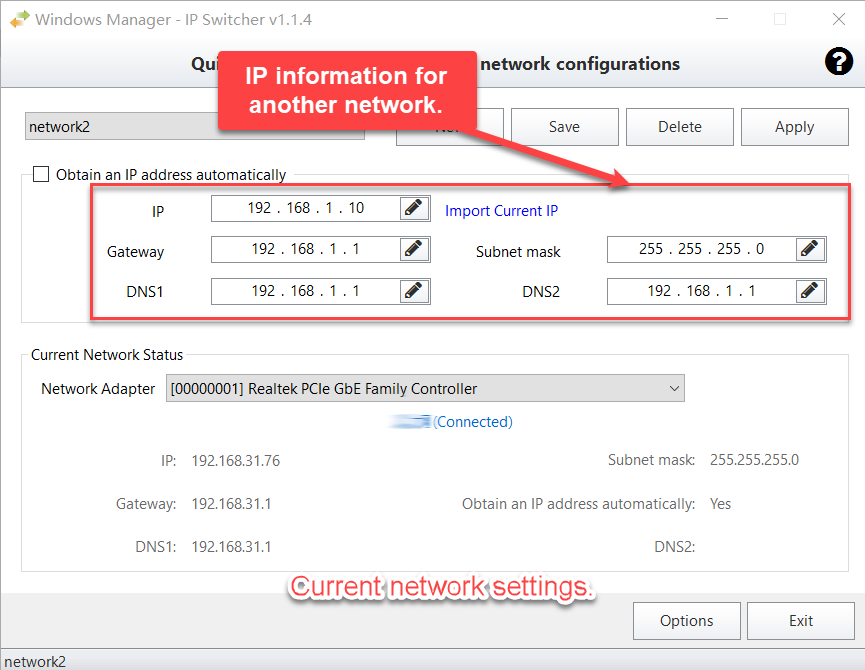
In the picture above, the selected profile is a different network: 192.168.1.10, with gateway 192.168.1.1. Current Network Status still shows 192.168.31.76, because that profile has not been applied. Selecting a name only loads the saved settings into the boxes.
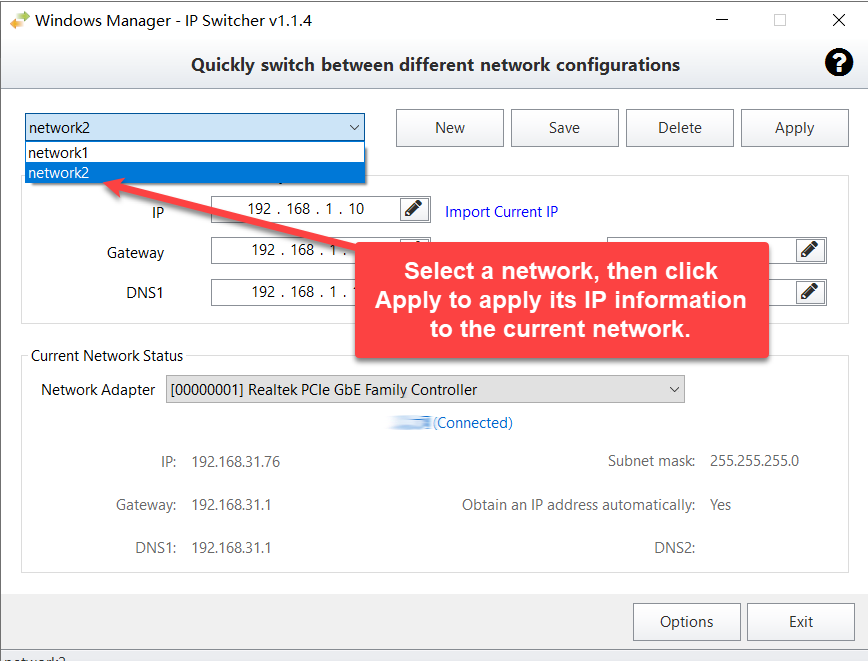
Select a network, then click Apply to apply its IP information to the current network. Confirm the prompt. After the adapter updates, the status area should match the profile you chose.
Before the first switch, save the network that already works. Select a new profile, click Import Current IP, then click Save. You then have a way back if the other profile uses the wrong gateway or subnet.
7. How do I read Current Network Status?
Current Network Status is a live reading of the selected adapter. It is not a copy of the profile, and editing the boxes above does not change it.
- Network Adapter: The adapter Windows reports, including its name. Choose the Ethernet or Wi-Fi adapter you intend to change. Virtual adapters can appear in the same list. Do not apply a LAN profile to a virtual adapter unless that is what you mean to change.
- Connection status: Connected, disconnected, connecting, disconnecting, media disconnected, and the other states Windows reports for that adapter.
- IP and Subnet mask: The IPv4 address in use. If the adapter has several IPv4 addresses, the first one is shown.
- Gateway: The IPv4 default gateway, when the adapter has one.
- Obtain an IP address automatically: Yes when the adapter is using DHCP. No when it has a static address.
- DNS1 and DNS2: The first two IPv4 DNS servers on the adapter. A blank DNS2 means the adapter does not have a second IPv4 DNS server.
If you saved a DNS2 address and the status still shows it blank, the profile has not been applied, or both DNS boxes contained the same address and Windows kept one. Apply the profile, then read this area again.
8. Can IP Switcher start with Windows and stay in the tray?
Click Options.
- Start with Windows: Creates a sign-in task so IP Switcher opens when you sign in. Clear the box to remove that task. The window can start minimized when it is launched this way.
- Minimize to system tray when minimizing: Minimizing hides the window and leaves an icon in the notification area. The icon tooltip is the program name and version.
Right-click the notification icon:
- Profile: Lists the saved names. Choosing one asks the same apply confirmation, then writes that profile to the adapter.
- Show: Brings the window back.
- Exit: Closes IP Switcher and saves the profiles.
Profiles are stored in IPSwitcher.xml in the same folder as the program. Keep that file if you want the names and addresses after you move the program folder. Deleting a profile removes it from this file. It does not restore the adapter to a previous address.
9. Things to watch
- Apply changes the real adapter. A wrong subnet mask or gateway can take this PC off the network. Save the working settings first with Import Current IP and Save, and keep that profile so you can apply it again.
- Save does not switch the network. The boxes can show one network while Current Network Status still shows another. That is expected until you click Apply and confirm.
- A static profile needs an IP address and a subnet mask. The gateway and DNS2 can be empty. DNS1 should be filled when you need name resolution and the profile is not using DHCP.
- DHCP clears the static boxes in that profile. Select Obtain an IP address automatically only for a network that has a DHCP server. Applying it removes the fixed address from the adapter.
- Check the adapter name. Apply writes to the adapter selected under Network Adapter. On a PC with Ethernet, Wi-Fi, and virtual adapters, the wrong row changes the wrong interface.
- The same address in DNS1 and DNS2 may become a single DNS server. Use two different servers when you want a second one, or leave DNS2 empty.
- Delete removes the saved profile only. You are asked: Are you sure you want to delete this profile? The adapter keeps whatever address it is using.
- Changing the address needs permission to configure the adapter. If Windows refuses the change, start Windows Manager in the usual way so the tool can apply network settings.
- The connection can drop while the new address is applied. Finish downloads or remote sessions first. If the new address is outside the current LAN, you will need the other profile, or physical access, to get back.
10. A typical way to keep a home profile and an office profile
- Connect at home and open IP Switcher. Click New, type Home, and click Import Current IP.
- Check the IP address, subnet mask, gateway, and DNS. Click Save. You do not have to click Apply, because the adapter is already using these values.
- Click New again and type Office. Enter the office IP address, subnet mask, gateway, and DNS, or select Obtain an IP address automatically if the office uses DHCP. Click Save.
- When you are at the office, select Office and click Apply. Confirm the prompt. Wait until Current Network Status shows the office address and the connection status is Connected.
- When you return home, select Home and click Apply again.
The same steps work from the notification icon: open Profile, choose the name, and confirm. The window does not have to stay open.
Try it now
Use IP Switcher when you move between networks that need different IP addresses, or when you want a fixed address ready to apply without retyping it. For wireless profiles and saved Wi-Fi passwords, continue with Wi-Fi Manager. To watch traffic on the adapter after a switch, open Network Monitor. The rest of the tools are on the product page.
Try it: Download Windows Manager and open IP Switcher to save the network you are using now.
